Wednesday, July 9, 2014

S'mores Popcorn


S'mores Popcorn

Summer is officially here and if there’s one thing that screams summertime it would have to be s’mores! There are s’more blizzards, waffles, pies, brownies and even cupcake mixes so we thought why not try something new? We decided to pair s’mores with one of our favorite snack foods: microwave popcorn!

Also, check out these awesome marshmallows made specifically for s’mores! 


Ingredients:

1 bag microwave popcorn
2 Tbsp butter
4 square s’more marshmallows
1 Hershey’s milk chocolate bar
1 whole graham cracker (2 squares)

Directions:

Pop your popcorn in the microwave, pour into a large bowl and set aside to cool.
It’s also a good idea to take out any unpopped kernels at this point.

In a nonstick pot, add the butter and place on the stove at medium-high heat until the butter melts. 

 
Add marshmallows and stir until completely melted. 


Continue stirring the marshmallows until they turn into a smooth, syrupy consistency. 


Remove from heat and pour over popcorn, stirring to coat evenly.

In a small bowl, break the chocolate bar into pieces and microwave, stirring every 30 seconds until the chocolate is completely melted and easy to drizzle. 


Drizzle the chocolate over the popcorn. 
You can stir to coat the popcorn evenly or leave the chocolate drizzled in a pretty pattern. 


In a small Ziploc bag, crunch the graham cracker with your fingers, until there are no large chunks left. 
Sprinkle the graham cracker crumbs over the popcorn.


This recipe is a fun snack for a family movie night or on those rainy days when you can’t sit outside with a campfire and toast marshmallows. It’s quick, easy and has all of the flavors of your favorite summertime treat with less mess. 

Enjoy!

Wednesday, May 21, 2014

Lemon Shortbread Cookies


Lemon Shortbread Cookies

Adapted from:

This is one of our all time favorite recipes from Betty Crocker. 
However, since it’s spring and everything is fresh and new we decided to embellish the recipe a bit. We’ve been loving all things lemon this spring so we thought why not incorporate our favorite flavor into our favorite cookie?


Ingredients:

1 cup (2 sticks) butter, softened
¾ cup powdered sugar (more for topping)
1 tsp vanilla extract
1 tsp lemon extract
2 cups all purpose flour (more for rolling)

Directions:

Preheat your oven to 350 degrees.
In a microwave safe bowl heat your butter just until it softens.
In a large bowl combine softened butter, 


 powdered sugar, 


vanilla extract, 


and lemon extract.


Stir until smooth.


Add in flour a half a cup at a time until you have a smooth dough.


Using your hands, mix the dough into a large ball and tear off chunks as you go.


On a floured surface, roll a chunk of dough out to between ¼ - ½ inch thick depending on how thick you like your cookies.
 
Using a fun cookie cutter cut out shapes until the dough is gone.


Place cookies on a non-stick cookie sheet and bake for 10 minutes. 


Remove cookies to a cooling rack covered with wax paper (trust us on this).
While cookies are still warm, use a sifter to sift powdered sugar on the top of each cookie. 
We didn’t have a sifter so we used this tea strainer instead but hey, it worked. 
This part is a little bit like watching a snowfall, very fun and relaxing. 


Let cookies cool completely before moving to a serving platter or plate. 
These are lovely display cookies but they definitely won’t last long. 


 We were inspired by 2 hours of Celtic music on YouTube while baking these and decided to try making a design with them. 
The cookies interlock with one another almost like gears so they are easy to shape in neat little designs. We had a little too much fun at this stage.


These cookies are the perfect companion to a cup of hot tea, iced tea or they do just as well on their own. 
We’ve refreshed one of our favorite recipes and created something wonderful that we can now enjoy all year round.

Enjoy!

Sunday, May 11, 2014

Spring Pasta Salad

Salad Supreme Pasta Salad

We are back! With a new recipe for spring! This pasta salad is one of our favorite recipes to make for the spring and summer because it is so easy and delicious. It's super colorful and is great for cookouts, picnics, tea parties, or any day! The recipe comes from McCormick's Salad Supreme bottle. We have been making this salad for years and we never get sick of it!

Ingredients:

1 box of pasta (we used bowtie pasta, but you can use any that you like!)
1 8 oz. bottle of italian dressing
1 cucumber (chopped)
1 red pepper (chopped)
1 green pepper (chopped)
1/4 cup salad supreme seasoning


Directions:

Boil your pasta according to the package directions


While you are waiting for your pasta to cook, wash and chop all of your veggies into about 1/2 inch pieces. They don't have to be perfect!


After your pasta is done to your desired tenderness, drain the noodles and run cold water over them so that they can cool down.

Pour your pasta into a large bowl. Add your italian dressing, salad supreme, and all your veggies and mix it all together!


Also you can use any type of vegetables that you want! We've seen it made with cucumber and tomatoes and we have been wanting to try black olives in it!

Once your pasta salad is finished, you can store it in the fridge once you've had your fill!

We hope you've enjoyed this recipe and try it for yourselves!

Happy Spring!

Tuesday, December 3, 2013

Thanksgiving Day Recipes

Thanksgiving Day Recipes 


Pumpkin Cream Cheese Pie

This recipe is from www.pillsbury.com however, it's also very popular on Pinterest. 
Makes: 1 pie


Ingredients:

1 cup sugar
3 tablespoons all purpose flour
1 (8 ounce) package of cream cheese
3 ounces cream cheese
1 ¾ teaspoons pumpkin pie spice
3 eggs
1 can (15 ounces) pumpkin
1 tablespoon milk

*Note: This recipe lists 1 refrigerated pie crust however, because of an incident we’re not going to mention, I chose to omit the pie crust. I’ve made this twice and no one has ever missed the crust.

Directions:

Set your oven to 375 degrees.
In a large bowl, combine the sugar, flour and all of the cream cheese using an electric mixer until smooth.


Separate half of the cream cheese mixture into another bowl and set it aside.


Add to your large mixing bowl the pumpkin, pumpkin pie spice, and eggs. 
If you’re like me you’ll want to crack the eggs into a smaller bowl and whisk them together before adding them into the pie mix. This helps distribute them so you won’t get a layer of egg in between your pumpkin pie.


Mix all of your ingredients until you have a smooth pumpkin colored mixture.
Pour your pumpkin mix into the pie plate.


Going back to your reserved cream cheese mix, add in the milk and stir until it becomes more like the texture of icing.


Drop the cream cheese mixture in spoonfuls evenly over the pumpkin mixture.


Using a knife, swirl the two mixes together without blending them too much.


Bake for 35-45 minutes until the edges brown and a knife inserted in the center comes out clean.
Cool 30 minutes, cover and chill in the refrigerator until ready to serve.


Enjoy!

Gordon Ramsay’s Lemon, Parsley and Garlic Butter Turkey

This recipe was featured on Gordon Ramsay's Ultimate Christmas cooking special on BBC America but it's perfect for any holiday turkey. 


Ingredients:
2 sticks butter (softened)
salt & pepper
1 tablespoon olive oil
6 tablespoons lemon juice (2 lemons)
1 ½ teaspoons minced garlic (3 cloves)
dried parsley

1 turkey (we used a 12lb Butterball)

Directions:

You’re going to want to thaw and wash your turkey ahead of time before using this recipe. 
Also, it’s a good idea to lift the skin and cut any connections so that the butter is easier to apply.

In a large bowl, place the softened butter.
Sprinkle each stick of butter with salt and pepper until evenly coated.
Add the olive oil and mix well. 
I find that by slicing the butter with a sharp knife it blends with the other ingredients easier.


Add the lemon juice, garlic and parsley, mixing until combined. 
It’s okay if the butter is still a little chunky at this point.


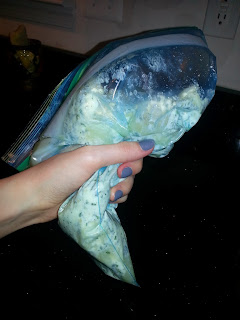
Pour the butter mixture into a large Ziploc bag and seal it.


Using your hands massage the bag until the ingredients are well combined.


Push the mixture to one of the bottom corners of the bag and twist it to form a piping bag.


Cut off the corner tip of the bag and begin to spread the mixture underneath the skin of your turkey massaging it in.
Apply the herb butter under and on top of the breast, legs and wings.
Feel free to add sliced onions and celery in the turkey cavity like we did.


Bake your turkey according to your directions. 
We baked our turkey at 350 degrees for 2 ½ hours until golden.


Enjoy!
Happy Thanksgiving to all!